

Moving a WordPress site to a new server sounds scarier than it actually is. Most of the anxiety comes from the “what ifs” — what if my images disappear, what if I break a bunch of links, what if Google forgets my site exists for a week. Fair worries. But if you follow the steps in order and resist the urge to rush the DNS change, this is a manageable weekend project, not a disaster waiting to happen.
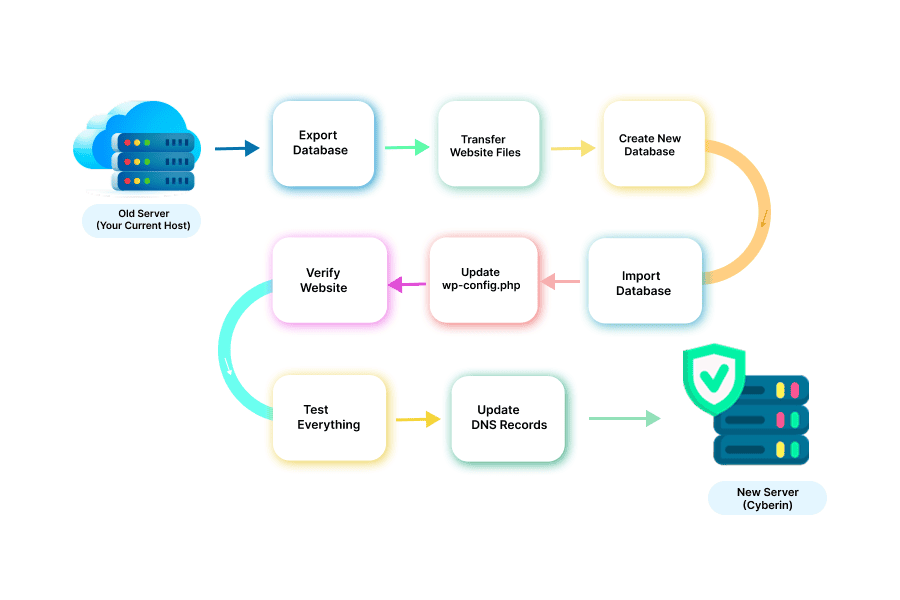
Here’s the short version of what you’re actually doing: you’re moving two things — your files and your database — getting WordPress to talk to that new database, testing that everything works, and only then flipping the switch on DNS.
One rule matters more than the rest: don’t touch your old hosting account until the new site is fully tested and working. Keep it as your safety net until you’re confident everything’s fine.
Before You Start, Check a Few Things
Before you dive in, make sure your new server can actually handle what your site needs:
- PHP and database compatibility — is the new server running a PHP version and database system your WordPress install actually supports?
- Resources — enough disk space, CPU, and RAM to not just survive, but grow a little?
- SSL — can you turn on HTTPS once you’ve moved over?
- File access — FTP/SFTP, or a File Manager in your control panel?
- Database access — can you actually create and manage databases without a fight?
- DNS records — back these up before touching anything
- Email (MX records) — if your domain handles email, save these too, or you’ll be reconstructing them from memory later
And obviously — back everything up first. Files and database, both. This is the one step nobody regrets doing, and plenty of people regret skipping.
Step 1: Get the New Hosting Account Ready
Log into your new host’s control panel and confirm you can find what you need. If you’re on cPanel, go ahead and:
- Create a new database
- Create a database user
- Set a password for that user
- Grant it the right permissions
Write these three things down somewhere you won’t lose them — database name, username, and password. You’ll need all of them again in a few minutes.
Step 2: Pull Your Database Off the Old Server
Everything that makes your site your site — posts, pages, comments, settings, users — lives in your database. Time to grab it.
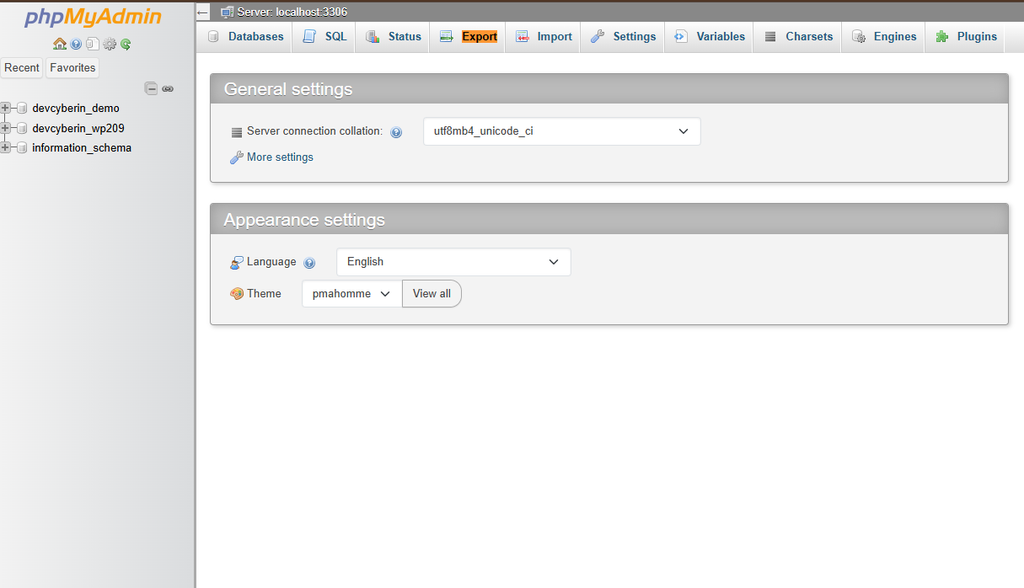
- Open phpMyAdmin on your old host
- Select the database tied to your WordPress install
- Click Export → Quick → SQL
- Download the
.sqlfile
That file is your entire site’s content, so don’t lose it in fifteen browser tabs.
Step 3: Grab Your Website Files
Now the files. Pick whichever method suits your site’s size:
- File Manager — fine for smaller sites
- FTP/SFTP — better if you’re dealing with a bigger site
Either way, grab the full WordPress installation — but if you only care about one folder, make it wp-content. That’s where your themes, plugins, and every image you’ve ever uploaded actually live. If your install sits inside public_html, copy the files from there.
Step 4: Upload Everything to the New Server
Open File Manager on the new host and head to your domain’s root folder — usually public_html.
- Upload what you copied
- Extract it if it came over as a ZIP
- Confirm the structure looks like this, sitting directly inside
public_html:
wp-admin
wp-content
wp-includes
wp-config.php
index.php
Here’s a mistake that trips people up constantly: everything ends up nested one folder too deep, like public_html/wordpress/, when your domain expects the files right there in public_html/. Worth a careful look before moving on.
Step 5: Bring the Database Back In
Time to import what you exported earlier.
- Open phpMyAdmin on the new server
- Switch to the database you created in Step 1
- Click Import
- Select your
.sqlfile and let it run
If the file’s too big for phpMyAdmin’s upload limit, check whether your host offers another way in — SSH, or a dedicated migration tool.
Step 6: Point WordPress at the New Database
WordPress has no idea it’s on a new server yet — you need to tell it. Open wp-config.php and update:
DB_NAMEDB_USERDB_PASSWORDDB_HOST(usuallylocalhost, but check with your host if not)
Save the file, and that’s it — WordPress now knows where to look.
Step 7: Test Before You Touch DNS
This is the step people skip when they’re impatient, and it’s exactly the step that saves you from a public embarrassment.
Don’t change DNS yet. If your host gives you a temporary preview URL, use it to look at the new site before anyone else can. Editing your local hosts file works too if you’re comfortable with that.
Click through:
- Home page
- Key landing pages
- A few blog posts
- Images
- Navigation menus
- Contact forms
- Login
- Themes and plugins
- Checkout and product pages, if you’re running a store
Look for broken links, missing images, PHP errors, and database connection errors. Then go to Settings → Permalinks in WordPress and hit Save, even without changing anything — it refreshes the rewrite rules and quietly prevents a bunch of 404 errors later.
Step 8: Now You Can Touch DNS
Once you’re confident the new site works, point your domain at it:
- Update the A record to the new server’s IP, or
- Change nameservers to your new host’s
Use the exact values your new host gives you — not something you’re guessing at. If your domain handles email, update those DNS records too, or you’ll be troubleshooting why your emails suddenly aren’t showing up instead of enjoying your migrated site.
Step 9: Check Everything Again After DNS Propagates
DNS doesn’t switch over instantly everywhere — it takes time to spread across the internet, so some visitors might briefly still land on the old server. Leave that old account running until propagation is done.
Once your domain has fully moved over, go back through the checklist:
- HTTPS working
- Images and media loading
- JavaScript and CSS behaving
- Login working
- Key pages intact
- Plugins functioning
- Email flowing
- Store still processing orders correctly, if relevant
When Something Goes Wrong
A few problems show up more often than others, so here’s the quick troubleshooting cheat sheet:
- Database connection error — recheck
DB_NAME,DB_USER,DB_PASSWORD, andDB_HOSTinwp-config.php, and confirm the database user actually has permission to use it. - Missing images — usually means
wp-content/uploadsdidn’t fully transfer, or landed in the wrong spot. - 404 errors everywhere — almost always a permalinks or
.htaccessissue. Re-saving permalinks usually fixes it. - HTTPS won’t work — confirm the domain is actually pointed at the new server and that an SSL certificate is installed there.
- Email stopped working — go back and check your MX records. This one’s almost always a DNS record that got missed.
Before You Close the Old Account
Don’t cancel your old hosting the moment the new site looks fine. Give it one more pass first:
- Site loads correctly
- HTTPS works
- Key pages open cleanly
- Images show up
- Core features work
- You can log in
- Plugins and themes are behaving
- Emails work
- You’ve got a current backup saved
- DNS is fully pointed to the new server
Once you can check off all of that with a straight face, you’re safe to let the old account go.
Conclusion
WordPress migrations feel bigger in your head than they are in practice. Back up first, move the files and database, connect them through wp-config.php, test everything on a staging setup before DNS ever gets touched, and give yourself the patience to actually check things rather than assume they worked.
And whatever you do — don’t delete the old hosting account the same day you migrate. Keep it around as your undo button until you’re genuinely sure you won’t need it.