


Moving to a new host sounds scary, but it’s really a matter of moving a few things in the right order: your files, your database, your email, and finally your DNS. Do it carefully and your visitors may never notice anything happened. Rush it and you can end up with missing images, database errors or a mailbox full of lost messages.
Here’s how to do it step by step: how to prepare, how to protect your data, how to test before you go live, and when it makes sense to hand the job to someone else.
1. Take Stock of What You’re Moving
Before you touch anything, work out exactly what lives in your current hosting account. Most people remember the website files and forget the rest.
Make a list that covers:
- Website files, including images, themes, plugins and scripts
- Databases and their users
- Email accounts, messages and attachments
- Domain and DNS settings
- SSL certificates and site configuration
- Cron jobs, redirects and other server-level settings
Then check that your new host can actually run your site. Look at PHP and database versions, storage space and any required extensions. It’s much easier to find a mismatch now than halfway through.
Before choosing a new hosting provider, compare the available web hosting plans and prices in India to understand which hosting option matches your website’s requirements.
One tip: keep your old hosting account active until the migration is finished and tested. It’s your safety net.
2. Back Everything Up First
If something goes wrong, a backup is what lets you put things back exactly as they were. Make separate copies of:
- Your website files and folders
- Your databases (MySQL or whichever you use)
- Your email accounts and mailboxes
- Key configuration files such as .htaccess and wp-config.php
You can usually download files through FTP or the File Manager in your control panel, and export databases with phpMyAdmin or a similar tool. Keep the backups somewhere else, like your computer or secure cloud storage, not only on the server you’re leaving.
And don’t delete anything from the old account just because you have a backup.
3. Move Your Website Files
There are two common ways to do it.
With FTP or SFTP. Connect to your old account with an FTP client and download your files. Then connect to the new server and upload them to the right folder, usually public_html or whatever document root your host specifies. When it’s done, check that every folder and file made it across.
With a control panel. If both hosts offer a File Manager, it’s often quicker to compress everything into one archive on the old server, download it, then upload and extract it on the new one.
Either way, double-check file permissions, the folder structure and your important configuration files once everything is in place.
4. Move Your Database
If your site runs on WordPress or any other database-driven platform, the database has to be moved separately from the files. This is the step people forget most often, and it’s why you sometimes see a “database connection error” after a move.
- Open phpMyAdmin on your old hosting account.
- Select your website’s database and export it as an SQL file.
- Create a new database on the new account.
- Create a database user and give it the right permissions.
- Import the SQL file into the new database.
- Update your site’s configuration with the new database name, username, password and hostname. On WordPress, that’s in wp-config.php.
Also check that your site’s URLs and database references are correct. If you need to replace URLs, use a proper migration tool rather than a plain find-and-replace. Serialized data can break if you edit it directly.
5. Don’t Forget Your Email
Moving your website does not automatically move your email. If you use addresses on your own domain, treat the email migration as its own job:
- Create the same email accounts on the new server
- Transfer existing messages, folders and attachments using an IMAP migration tool or another supported method
- Check that each mailbox has enough storage
- Recreate any forwarders and filters
- Update MX, SPF, DKIM and DMARC records where needed
- Test sending and receiving
If your email runs through an outside service like Google Workspace or Microsoft 365, look at your current DNS setup before you change anything. Don’t overwrite working email records with your new host’s defaults.
6. Test Before You Switch the DNS
This is the step that saves the most headaches. Before you send visitors to the new server, check that everything works there first. Your host may offer a temporary URL or preview feature, or you can use a hosts-file entry on your own computer.
Go through these:
- The homepage and key inner pages load properly
- Images, CSS and JavaScript all work
- Contact forms submit
- The WordPress dashboard and plugins behave
- The database connects without errors
- Login, checkout and payments work, if you have them
- The SSL certificate is installed
- Redirects and important URLs work
If you run an online store, place a test order. Fix anything that’s broken now, while nobody is watching.
7. Point Your Domain to the New Host
Once you’re happy with the test, update your DNS records so visitors land on the new server. The ones you’re most likely to touch are:
- A record: points your domain or subdomain to the new server’s IPv4 address
- AAAA record: does the same for IPv6, if your host supports it
- CNAME record: sends one hostname to another
- MX record: controls where incoming email goes
Save a copy of your current DNS records before you change anything. You can also lower the TTL (Time to Live) a day or so ahead, which helps some resolvers pick up the change faster. Just don’t expect it to be instant. Propagation times vary, and a lower TTL doesn’t guarantee a quick switch.
Leave the old hosting account running while the change spreads.
8. Keep Downtime to a Minimum
Downtime costs you visitors, sales and enquiries, and it can affect search engines trying to reach your site. A few habits help a lot:
- Pick a quiet time for the switch
- Take a fresh backup just before the final transfer
- Transfer and test everything before touching DNS
- Keep the old environment running during propagation
- Avoid changing site content during the final sync
- Check that the site is reachable from different networks afterwards
If your site takes frequent orders, sign-ups or form submissions, pay extra attention to the database. Copying an old backup can wipe out recent orders or user data. For those sites, synchronise the latest database changes right before you switch traffic.
9. Check Everything After the Move
When the DNS change has gone through, run another round of checks:
- The site loads from the new server
- Pages and images display correctly
- Forms and logins work
- SSL is active
- The database connects
- Email sends and receives
- Redirects and canonical URLs are right
- Backups are set up on the new host
- Analytics and search tracking still work
Take a look at Google Search Console for any unexpected crawling or indexing issues. And give it a few days of monitoring before you cancel the old subscription.
10. When to Get Professional Help
Doing it yourself works well for smaller, simpler sites. It’s worth getting help when:
If your current hosting plan no longer provides sufficient resources for your website, compare the VPS hosting price in India to understand the resources and costs involved in upgrading.
- Your site has a lot of files and large databases
- You run an eCommerce store with frequent transactions
- You’re moving several websites or lots of email accounts
- Your site uses custom applications or server setups
- FTP, databases and DNS aren’t your thing
- You’d rather not spend your weekend on it
If you’re moving because your current shared hosting plan cannot meet your website’s resource requirements, read our comparison of shared hosting vs VPS hosting to understand the differences before choosing your next hosting plan. Before you hire anyone, ask what’s included. Does the service cover email migration, DNS changes, SSL setup, database synchronisation and testing afterwards? The scope varies a lot between providers.
How to Request Migration Help from Cyberin
If you’re moving to Cyberin and would rather not do it all yourself, you can ask the team to help. It speeds things up if you have these details ready:
- The name of your current hosting provider
- Your domain name
- The platform your site runs on, such as WordPress or a custom PHP application
- How many websites and databases need to move
- Whether you want email accounts and messages transferred too
- Any special configurations or requirements
Get in touch with the Cyberin support team through its official channels and ask about migration assistance. They’ll tell you how to share the access they need. Never send passwords in a public message or over an unsecured channel. Use the secure method the team gives you.
Before you go ahead, confirm the scope of the migration, the expected timeline and any conditions that apply.
Mistakes That Cause Migration Headaches
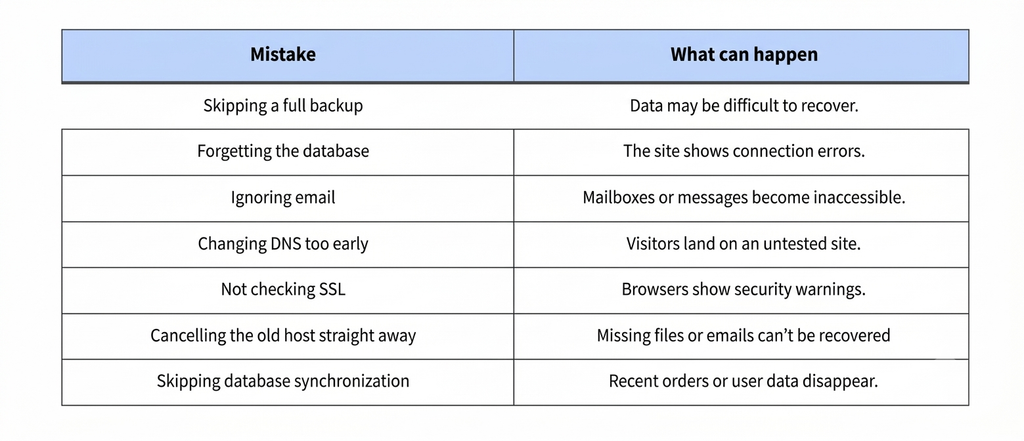
Small oversights cause most of the problems. Here’s what to watch for:
Conclusion
A successful migration is about more than copying files. You need to move the database, plan the email transfer, set up DNS and test the important parts of your site before you flip the switch. A full backup and a bit of patience will get you most of the way.
If you’re moving to Cyberin, have a look at its website migration assistance and talk to the support team about how the process works and what they need from you.
Frequently Asked Questions
1. How long does website hosting migration take?
It depends on the size of your site, how complex the database is, how much email you have and how your server is configured. A small site can take a few hours. Larger sites or complex applications can take longer.
2. Will I lose website data during migration?
Not if you do it properly. Full backups, correctly transferred files and databases, and a final sync of recent changes all help prevent data loss.
3. Can I migrate my WordPress website to another host?
Yes. Move the files and the database, update the database details in your configuration, and test the site on the new server before you change DNS.
4. Will my domain name change when I migrate hosting?
No. You keep your domain and simply update its DNS records to point to the new server.
5. Will migration affect my SEO?
A well-managed migration shouldn’t need any URL changes. Problems like downtime, broken links, wrong redirects or indexing issues can still hurt your search performance, so test your key pages and keep an eye on Google Search Console afterwards.
6. Do I need to transfer my email accounts separately?
Usually, yes. Your files and database don’t include your email messages, so plan the mailbox migration and your email DNS records separately.
7. Can I migrate without any downtime?
You can keep it to a minimum by preparing the new environment, testing in advance, syncing dynamic data and updating DNS carefully. But zero downtime can’t always be guaranteed.
