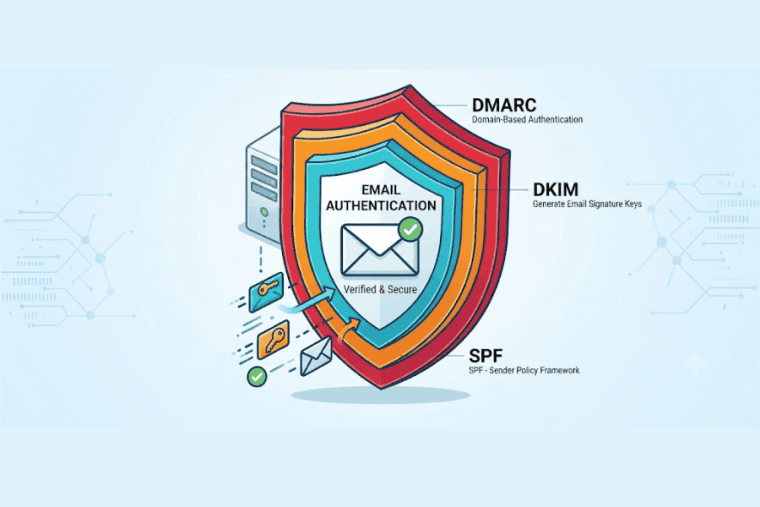


SPF, DKIM, and DMARC are all ways to verify emails. They protect your domain name from being spoofed and generally make email safer. They have the email servers check that the email is from a known sender to make sure it is real.
It is important to set these records up if you are using cPanel hosting in India for your website and business emails. Missing or incorrect records can cause authentication to fail and your emails to end up in spam or be rejected.
This makes it easy to set SPF and DKIM. Paste the email address in there. Deliverability and DMARC. This book will take you through each step, offering hints if you get stuck.
What Are SPF, DKIM and DMARC, Really?
These are three email authentication standards that work as a team. Each one checks something different, and together they make it much harder for anyone to spoof your domain.
1. SPF (Sender Policy Framework)
SPF is a DNS TXT record that lists which mail servers and IP addresses are allowed to send email for your domain.
When someone receives an email from you, their mail server looks up your SPF record and asks, “Is the server that just sent this message on the approved list?” If it is, great. If it isn’t, that’s a red flag.
2. DKIM (DomainKeys Identified Mail)
DKIM adds a digital signature to every email you send. The receiving server checks that signature against a public key published in your DNS records.
If the signature checks out, it tells the receiving server two things: the email was authorised by your domain, and its signed content wasn’t tampered with along the way. Think of it as a tamper-evident seal on an envelope.
3. DMARC (Domain-based Message Authentication, Reporting and Conformance)
DMARC sits on top of SPF and DKIM. It checks whether at least one of them passes and lines up with the domain in the visible “From” address. It also tells receiving servers what to do with messages that fail.
You get three main policies to choose from:
- None (
p=none): Just watch and report. Failed messages aren’t treated differently. - Quarantine (
p=quarantine): Ask receiving servers to treat failed messages as suspicious, usually by sending them to spam. - Reject (
p=reject): Ask receiving servers to refuse messages that fail DMARC.
SPF vs DKIM vs DMARC: The Quick Comparison
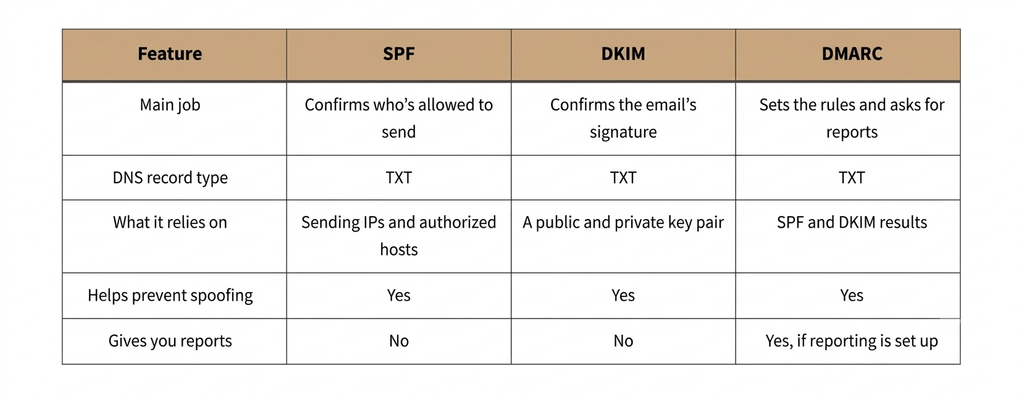
None of them does the whole job alone, so it’s worth setting up all three together.
Before You Start
A few minutes of preparation will save you a lot of confusion later. Make sure you have:
- Access to your cPanel account
- A registered domain connected to your hosting account
- Access to your domain’s DNS management settings
- A list of every service that sends email using your domain (more on why this matters below)
- An active email address if you want to receive DMARC reports
One important thing to check first: your domain’s authoritative nameservers decide where your DNS records need to live. If your domain uses Cloudflare or your registrar’s nameservers, you’ll need to add the records there, not in cPanel’s local DNS settings. A lot of “I added the record but nothing changed” frustration comes from this one detail.
Before configuring email authentication, make sure you know how to access and navigate your cPanel control panel. If you’re new to cPanel, understanding its main features will make it easier to find Email Deliverability and manage your domain settings.
How to Configure SPF in cPanel
cPanel has an Email Deliverability tool that can suggest and manage your SPF record for you, so you don’t have to write it from scratch.
Step 1: Log in to cPanel
Open your hosting account’s cPanel login page and sign in with your username and password. Once you’re in, find the Email section on the dashboard.
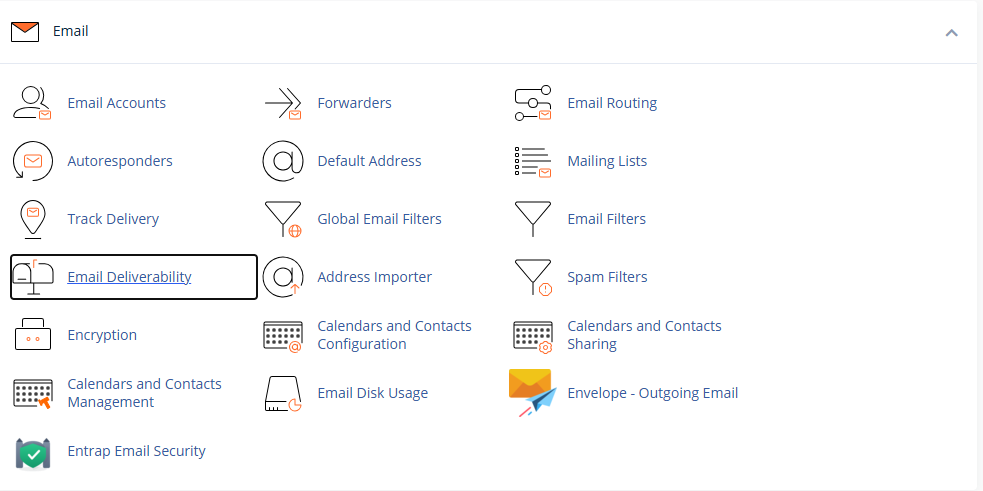
Step 2: Open Email Deliverability
Under the Email section, click Email Deliverability. This page lists the domains on your hosting account and flags any problems with their email authentication records.
Step 3: Pick Your Domain
Find the domain you want to set up and click Manage next to it.
Step 4: Look at the Suggested SPF Record
Find the SPF section. cPanel shows your current SPF record, if you have one, and offers a suggested record when it spots a problem.
Don’t just click install without reading it. Check that the suggestion includes every legitimate service that sends email from your domain. If you also send mail through something like Google Workspace or Microsoft 365, those services’ sending servers need to be part of your SPF record too.
Step 5: Install or Customise the Record
If the suggested record looks right, use the install option. If you need to add other authorised senders, choose the customise option and update the entries.
Here’s what an SPF record can look like:
v=spf1 a mx ip4:203.0.113.10 ~all
That’s only an illustration, so please don’t copy it as-is. Swap in your own sending IP and include whatever services your email setup actually uses. The ~all at the end means “soft fail” for senders that aren’t on the list.
Heads-up: a domain should have only one SPF record. If several services send email for you, merge their authorised sources into a single record. Creating multiple SPF TXT records is one of the most common ways to break SPF without realising it.
How to Configure DKIM in cPanel
DKIM signs your outgoing email with a cryptographic signature, and cPanel can generate and manage the DKIM record for your domain.
Step 1: Open Email Deliverability
Log in to cPanel and go to Email → Email Deliverability.
Step 2: Select Your Domain
Find your domain and click Manage. You’ll see the DKIM section with its current status and a suggested DNS record.
Step 3: Review the DKIM Record
A typical DKIM record includes:
- Name: the DKIM selector, followed by
._domainkeyand your domain - Type: TXT
- Value: the DKIM public key and related record information
For instance, a selector might look like this:
default._domainkey.example.com
Your actual selector and public key depend on how your cPanel server is configured, so use what cPanel gives you rather than copying an example.
Step 4: Install the DKIM Record
If your hosting server manages your domain’s authoritative DNS, just use the install option in cPanel.
If your DNS is managed somewhere else, copy the complete DKIM record and add it at your DNS provider. Copy the whole public key, without dropping or changing a single character. These keys are long, and a missing character is enough to break validation.
Step 5: Check the Status
Go back to Email Deliverability and look at the DKIM status. If the record is published correctly and recognised, cPanel should stop reporting the related DNS issue.
How to Configure DMARC in cPanel
DMARC tells receiving servers how to handle emails that fail authentication, and it lets you receive reports about what’s happening with your domain’s email. Unlike SPF and DKIM, DMARC needs its own separate DNS TXT record.
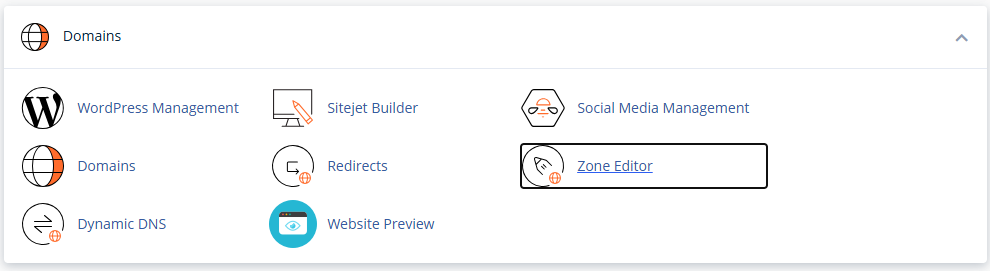
Step 1: Open the Zone Editor
Log in to cPanel and go to Domains → Zone Editor. Find your domain and click Manage.
Step 2: Add a New Record
Click Add Record and choose the DMARC option if you see one. If your version of cPanel doesn’t have a dedicated DMARC option, choose a TXT record instead.
Step 3: Enter the Details
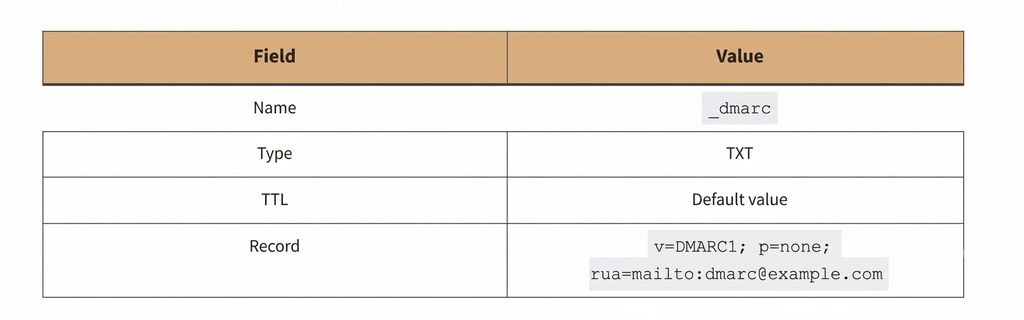
Replace example.com with your own domain, and use an email address you actually check for the reports.
This is a gentle, monitoring-only setup. With p=none, you collect data on authentication results without asking receiving servers to quarantine or reject anything.
Step 4: Save It
Review the details and click Save Record. Your DMARC record should now be published in your domain’s authoritative DNS zone.
Step 5: Read Your Reports
Once receiving servers start processing mail from your domain, the address you listed may start receiving aggregate DMARC reports. They’re not exactly bedtime reading, but they’re useful. They can show you:
- Which servers are sending email using your domain
- Whether SPF and DKIM are passing
- Whether messages line up with your domain
- Whether unknown sources are trying to send as you
Spend some time with these reports before you tighten your policy.
Choosing a DMARC Policy: None, Quarantine or Reject
This is where it pays to be patient. A policy that’s too strict, too early, can block your own legitimate emails.
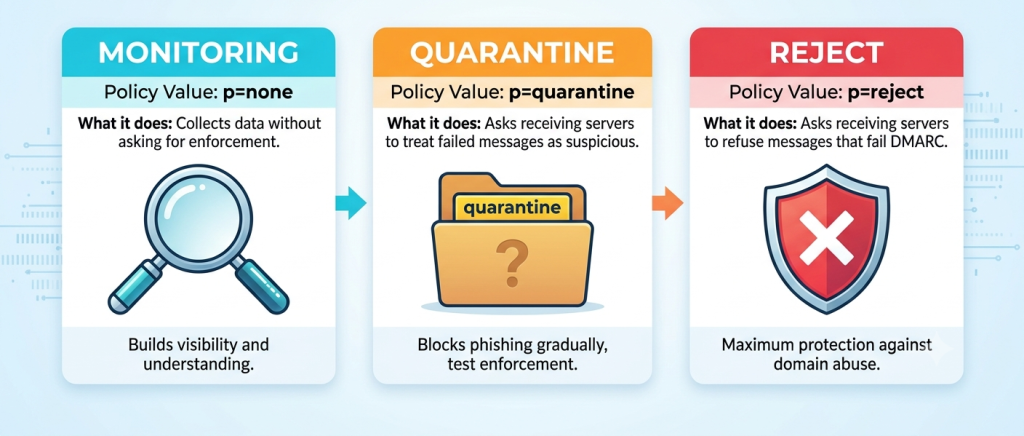
The sensible route is to start with p=none. Once your reports show that all your legitimate senders are configured correctly, you can move gradually towards p=quarantine and, eventually, p=reject.
Before you tighten anything, check every service that sends email from your domain: contact forms, transactional email systems, newsletters, and any third-party apps. Forgetting one of these is how a perfectly good invoice system suddenly stops delivering.
How to Check That Everything Works
Once all three records are in place, make sure they’re actually doing their job.
1. Check inside cPanel
Go back to Email Deliverability, select your domain, and look at the SPF and DKIM sections. If cPanel spots a configuration problem, it’ll tell you.
2. Check your DNS records publicly
You can use an external DNS lookup tool to confirm your records are visible to the world. Look up:
- SPF: your domain’s TXT record
- DKIM: your selector’s TXT record
- DMARC:
_dmarc.yourdomain.com
Make sure the values match what you configured. If you’ve just made changes and don’t see them yet, it may simply be DNS propagation still catching up.
3. Send yourself a test email
Send an email from your domain to an address you can access, then open the message’s original headers (or “show original” / “view source”, depending on your email client). Look for:
spf=passdkim=passdmarc=pass
If you see all three, the checks passed for that message. One caveat: seeing your records in DNS doesn’t guarantee authentication will succeed. The receiving server still has to evaluate the real email and how it was sent.
Common Problems (and How to Fix Them)
Even when you’ve done everything right, things can go sideways. Here are the usual suspects.
SPF record not found
Most likely, the SPF TXT record is either not added to the authoritative DNS zone or has not yet propagated. Solution: Verify the active nameservers for your domain and verify if the SPF record is added to the correct DNS zone.
Multiple SPF records
Different email services likely have different SPF TXT records. Fix: Have a single SPF record that lists all the approved senders. Having more than one SPF record can cause a permanent SPF error.
DKIM authentication failed
Most likely you have the wrong public key, the selector does not match the signing configuration or the DNS record is missing. Check the selector and see the difference between the public key published and the one your email service gives you.
DMARC record not found
The most likely cause is either the record name is incorrect or the TXT record was added by a DNS provider that does not control the primary nameservers for the domain. Fix: Make sure the record is properly configured at _dmarc.yourdomain.com in the correct DNS zone.
Emails still landing in spam
Likely reason: SPF, DKIM and DMARC are only one part of deliverability. Server reputation, sending habits, message content and other mail-server settings all play a role too. Fix: check your authentication results, your sending IP’s reputation, reverse DNS (PTR), your mail server configuration, and any filtering on the recipient’s side. For a wider look at this, see our guide to keeping emails out of spam.
If you use a custom domain for business communication, choosing a suitable professional email service is also important. Make sure its sending servers are included in your SPF and DKIM configuration so your business emails can pass authentication checks.
Habits That Keep Your Email Authentication Healthy
A few simple habits go a long way:
- Keep one SPF record. Put every legitimate sender into that single record.
- Keep DKIM keys current. Use the keys your email provider generates, and update DNS if your provider changes them.
- Start DMARC in monitoring mode. Use
p=nonefirst, so you spot problems before they cost you emails. - Actually read your DMARC reports. They’ll show you unauthorised senders and authentication failures.
- Remember your third-party services. Newsletter tools, CRMs and billing systems all send mail on your behalf.
- Confirm DNS changes on the authoritative nameservers. The right record in the wrong place does nothing.
- Test before tightening. Verify your legitimate sources before moving to quarantine or reject.
Conclusion
SPF says who’s allowed to send your email. DKIM proves the message is genuine and untouched. DMARC decides what happens when a message fails those checks, and tells you about it.
cPanel makes SPF and DKIM easy to manage through Email Deliverability, while DMARC can be added through the Zone Editor or the DMARC option if your version has one. Start by checking your existing DNS records, set up each method, and test your outgoing mail before moving to a stricter DMARC policy. If you’re running your site on cPanel hosting in India, it’s worth making this part of your regular routine. A few minutes of setup now means fewer “did you get my email?” conversations later.
Frequently Asked Questions
1. What is the difference between SPF, DKIM and DMARC?
SPF checks which mail servers are allowed to send mail for your domain. DKIM is a way to validate an email message is authentic. DMARC ensures SPF and DKIM alignment, and instructs servers how to handle messages that fail authentication.
2. Can I configure SPF, DKIM and DMARC in cPanel?
Yes, you can configure SPF and DKIM from the Email Deliverability window in cPanel. If your cPanel server is your domain’s DNS server, you can use the Zone Editor to Add DMARC as a TXT record.
3. Do I need all three records for my domain?
Yes . All three should be configured. SPF checks that the sending server is authorised, DKIM checks the email signature, and DMARC sets the rules for authentication and reporting.
4. How long does it take for SPF, DKIM and DMARC records to work?
It may take a few minutes for DNS changes to show up, but depending on your DNS provider and your TTL settings, it may take longer for the changes to propagate. Before testing email authentication, check your records using a DNS lookup tool.
5. Why are my emails going to spam even after configuring SPF, DKIM and DMARC?
And email delivery is just one part of verifying that they are real. The way an email arrives in the inbox depends on the reputation of the IP that is sending it, its content, how often it is sent, reverse DNS and filtering on the receiving end.
6. Which DMARC policy should I use: None, Quarantine or Reject?
To test the authentication results without stopping email delivery with DMARC enforcement, start with p=none. If all of the valid sending services have passed the alignment and authentication tests, proceed to {p=quarantine} or {p=reject}.
